


Why Lighting Defines Everything in a Studio
In a controlled studio environment, lighting is not a supporting element—it is the foundation of the entire visual output. Cameras capture what light reveals, and without proper lighting, even the most advanced equipment cannot produce a professional image.
The purpose of studio lighting is not simply to make the subject visible. It is to shape depth, control contrast, guide attention, and define the overall mood of the scene. Every adjustment in light intensity, direction, and softness directly alters how the subject is perceived.
A well-designed lighting setup removes randomness. It replaces inconsistent results with repeatable quality.
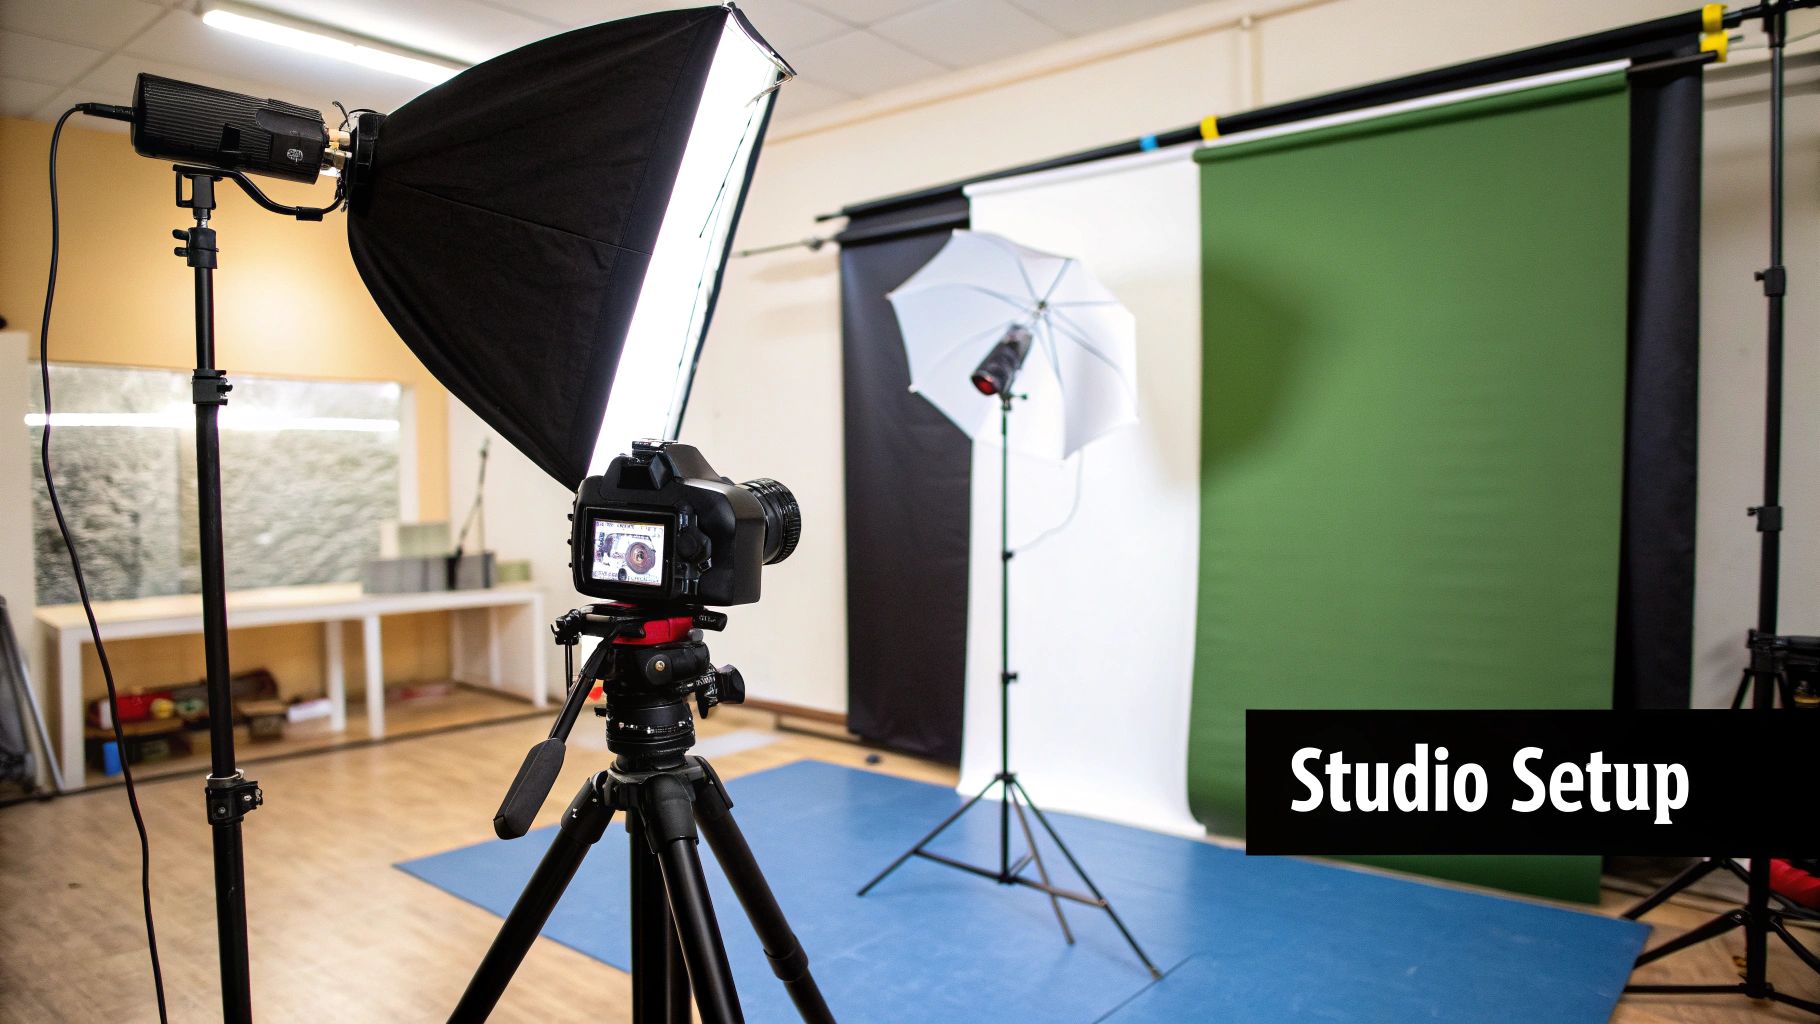
The Structure of Light: Understanding the Three-Point System

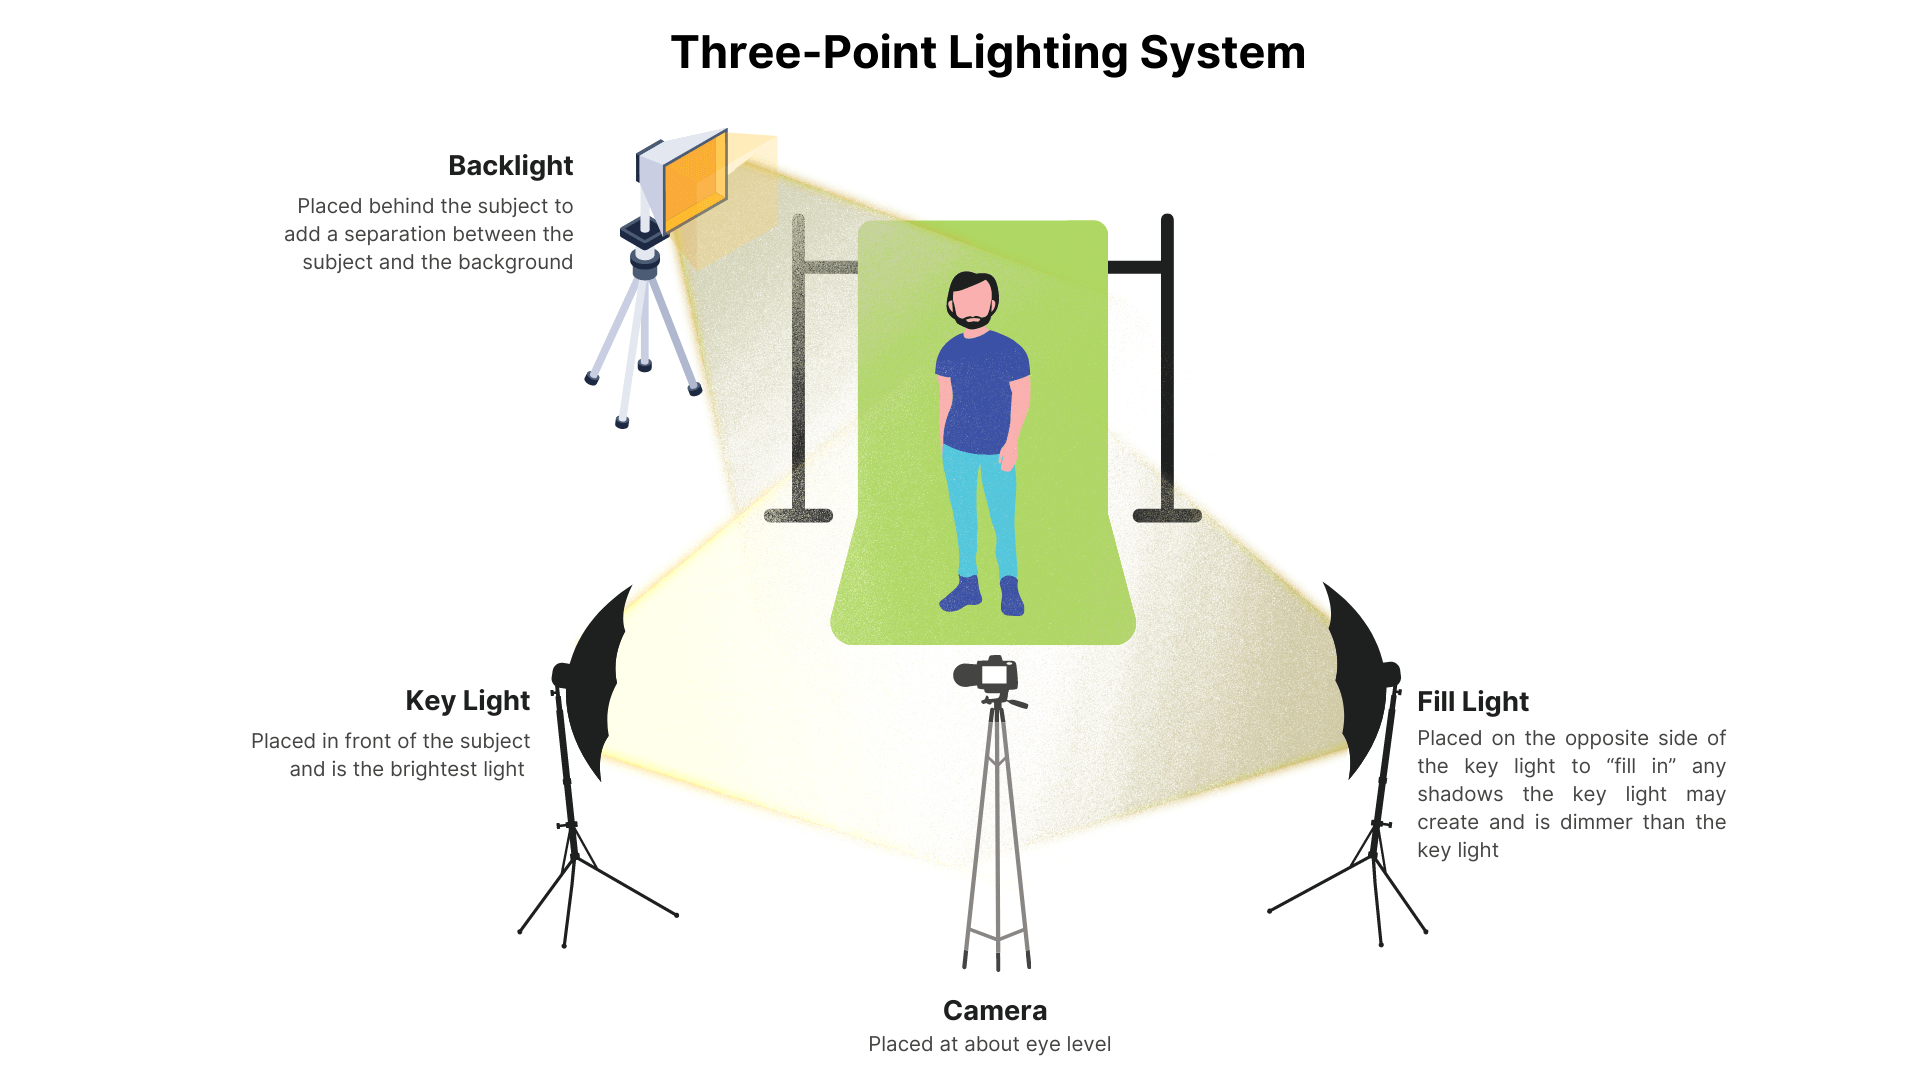
The most widely used foundation in studio environments is the three-point lighting system. It provides a structured way to control how light interacts with the subject from multiple directions.
The key light acts as the primary source of illumination. Positioned at an angle—typically around forty-five degrees relative to the subject—it creates the main highlights and shadows. This light defines the shape of the face and establishes depth.
The fill light is introduced to manage contrast. Without it, shadows created by the key light can become too harsh, especially in smaller studio environments. The fill light does not eliminate shadows entirely; it softens them to maintain detail while preserving dimension.
The back light, often placed behind and slightly above the subject, separates the subject from the background. This subtle rim of light prevents the image from appearing flat and adds a sense of depth that is difficult to achieve with front lighting alone.
When balanced correctly, these three elements produce a clean, professional look that remains consistent across different shooting conditions.
Light Quality: Soft Light vs Hard Light


Light is not defined only by brightness, but by its quality. The distinction between soft light and hard light determines how shadows appear and how forgiving the image is.
Soft light spreads evenly across the subject, producing gradual transitions between light and shadow. This type of lighting is achieved through larger light sources or diffusion tools such as softboxes. It is commonly used in content creation because it reduces skin imperfections and creates a balanced, approachable look.
Hard light, by contrast, produces sharp shadows and high contrast. It is more directional and often used for dramatic or stylized visuals. While it can create striking images, it is less forgiving and requires precise control.
In most studio setups focused on consistency and clarity, soft light is preferred. It offers greater control and reduces the risk of unwanted harsh shadows.
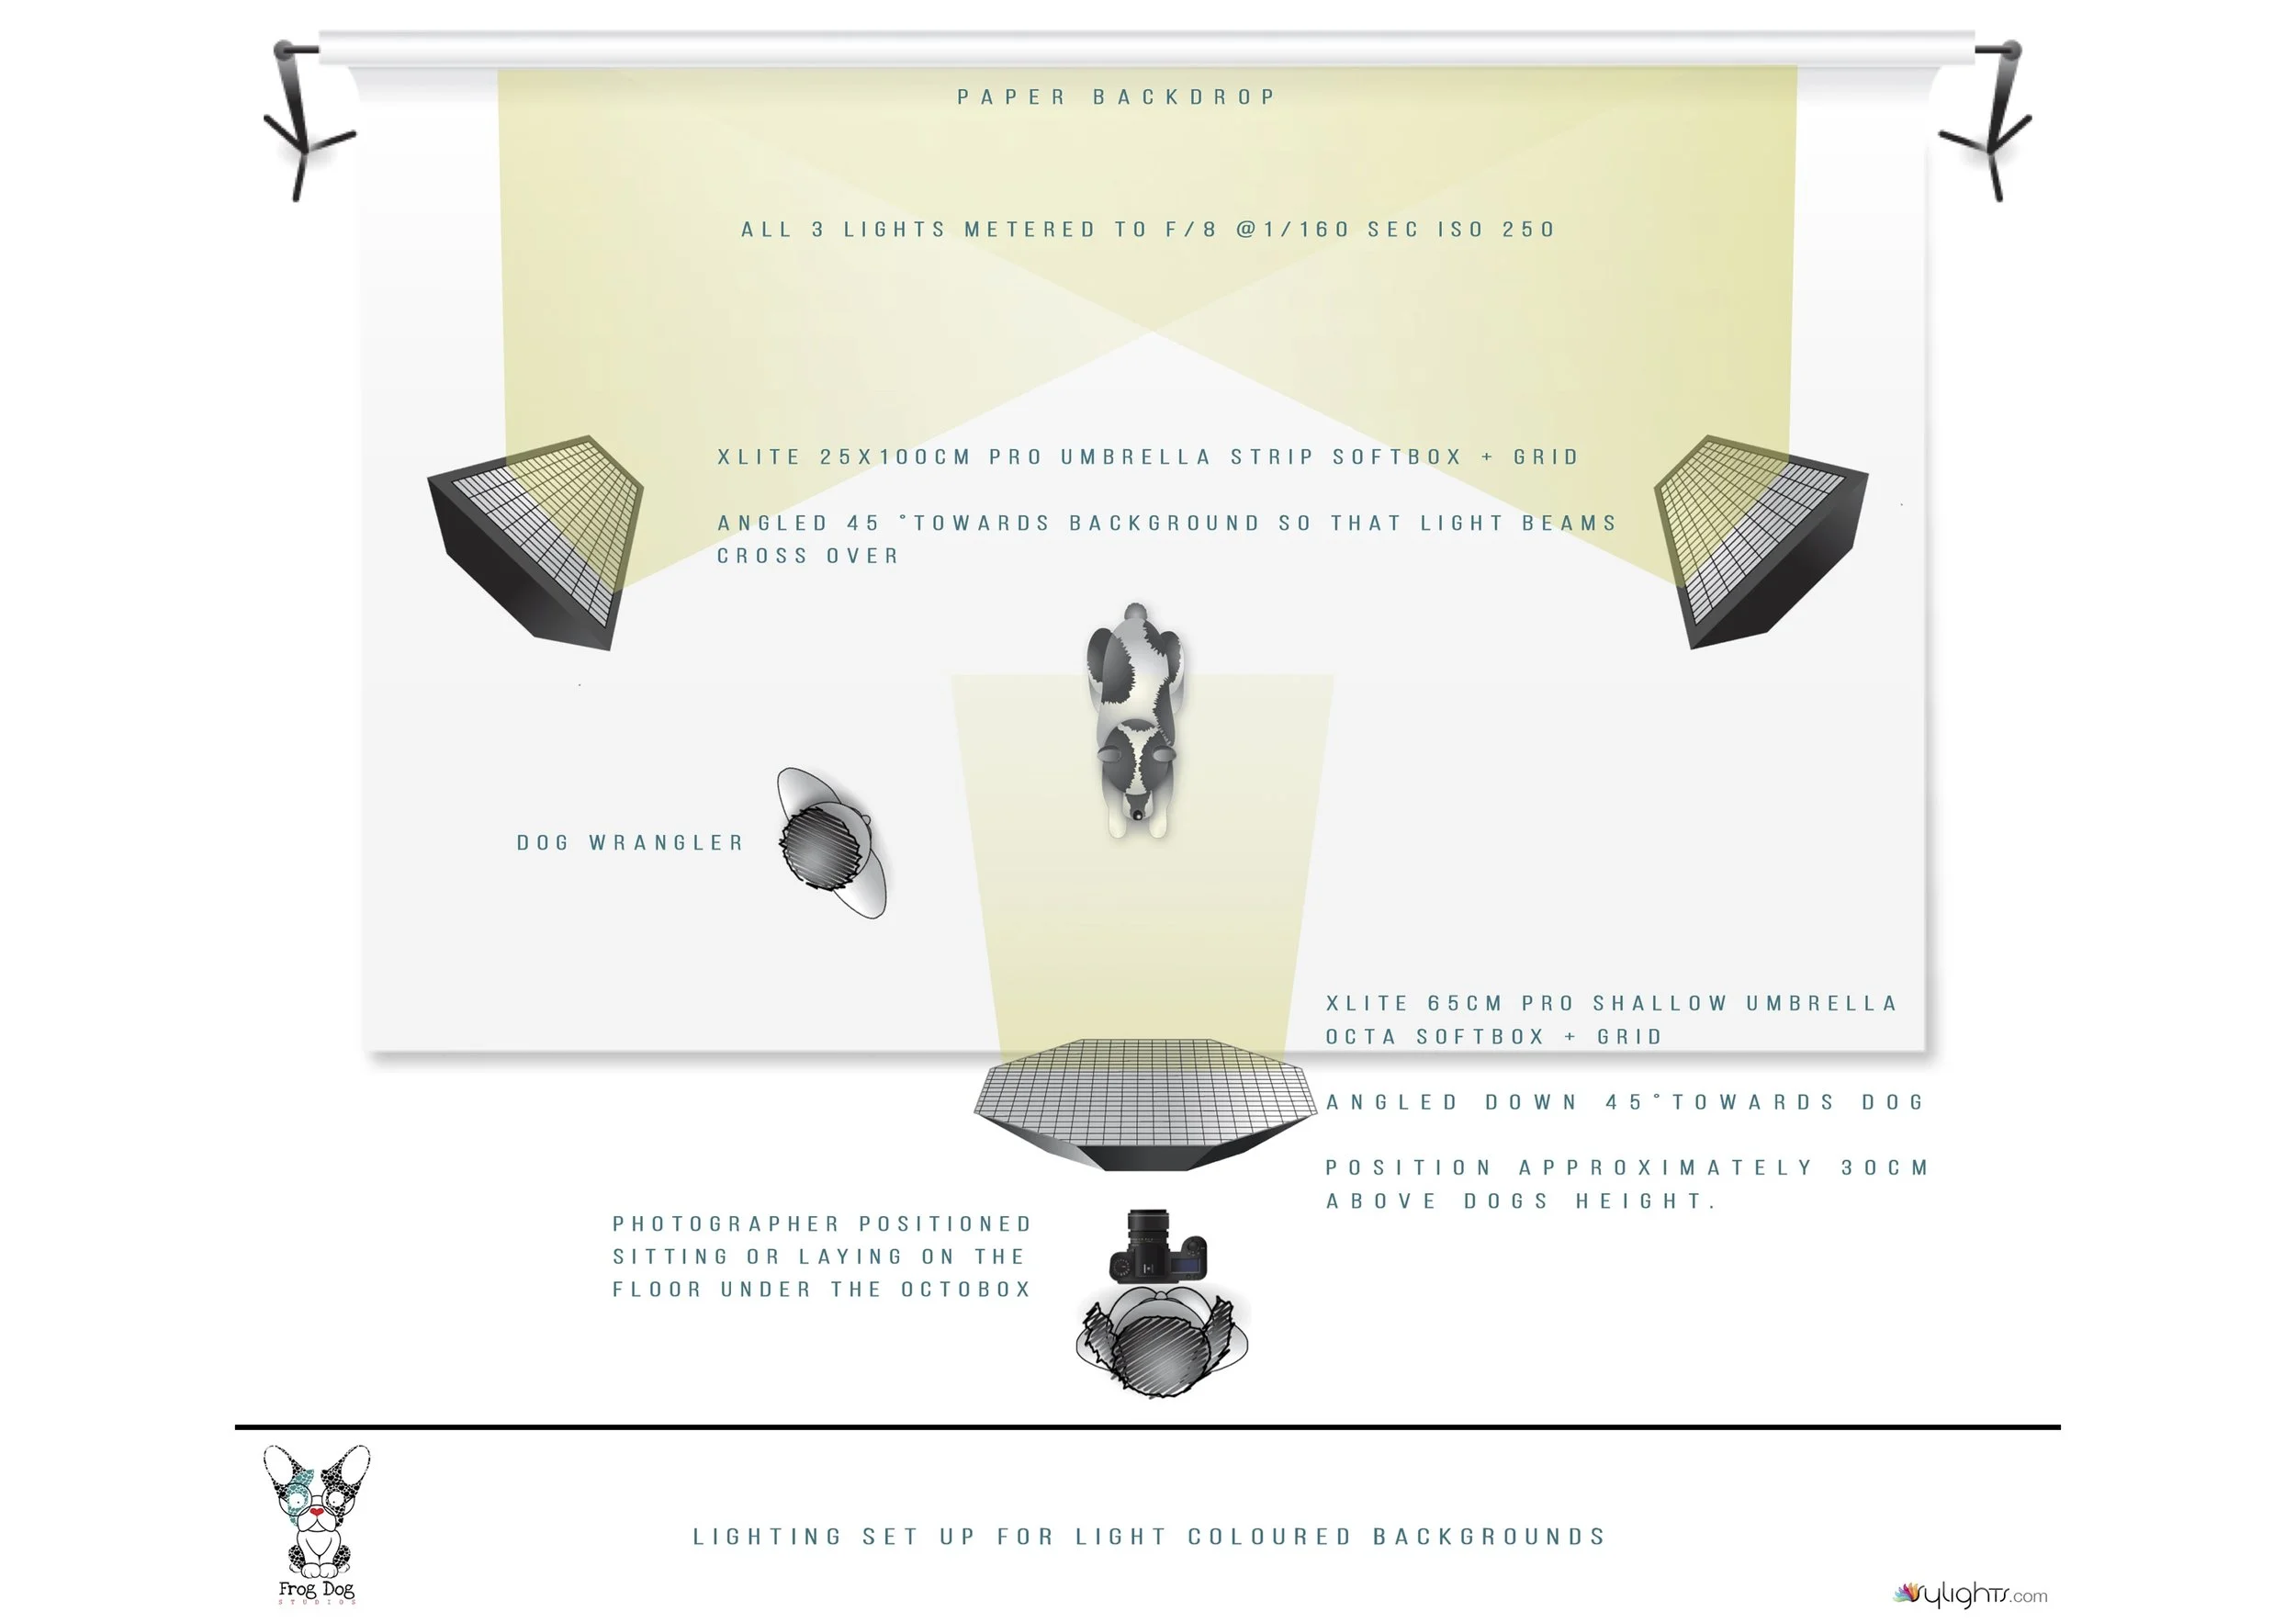
Light Positioning and Angles
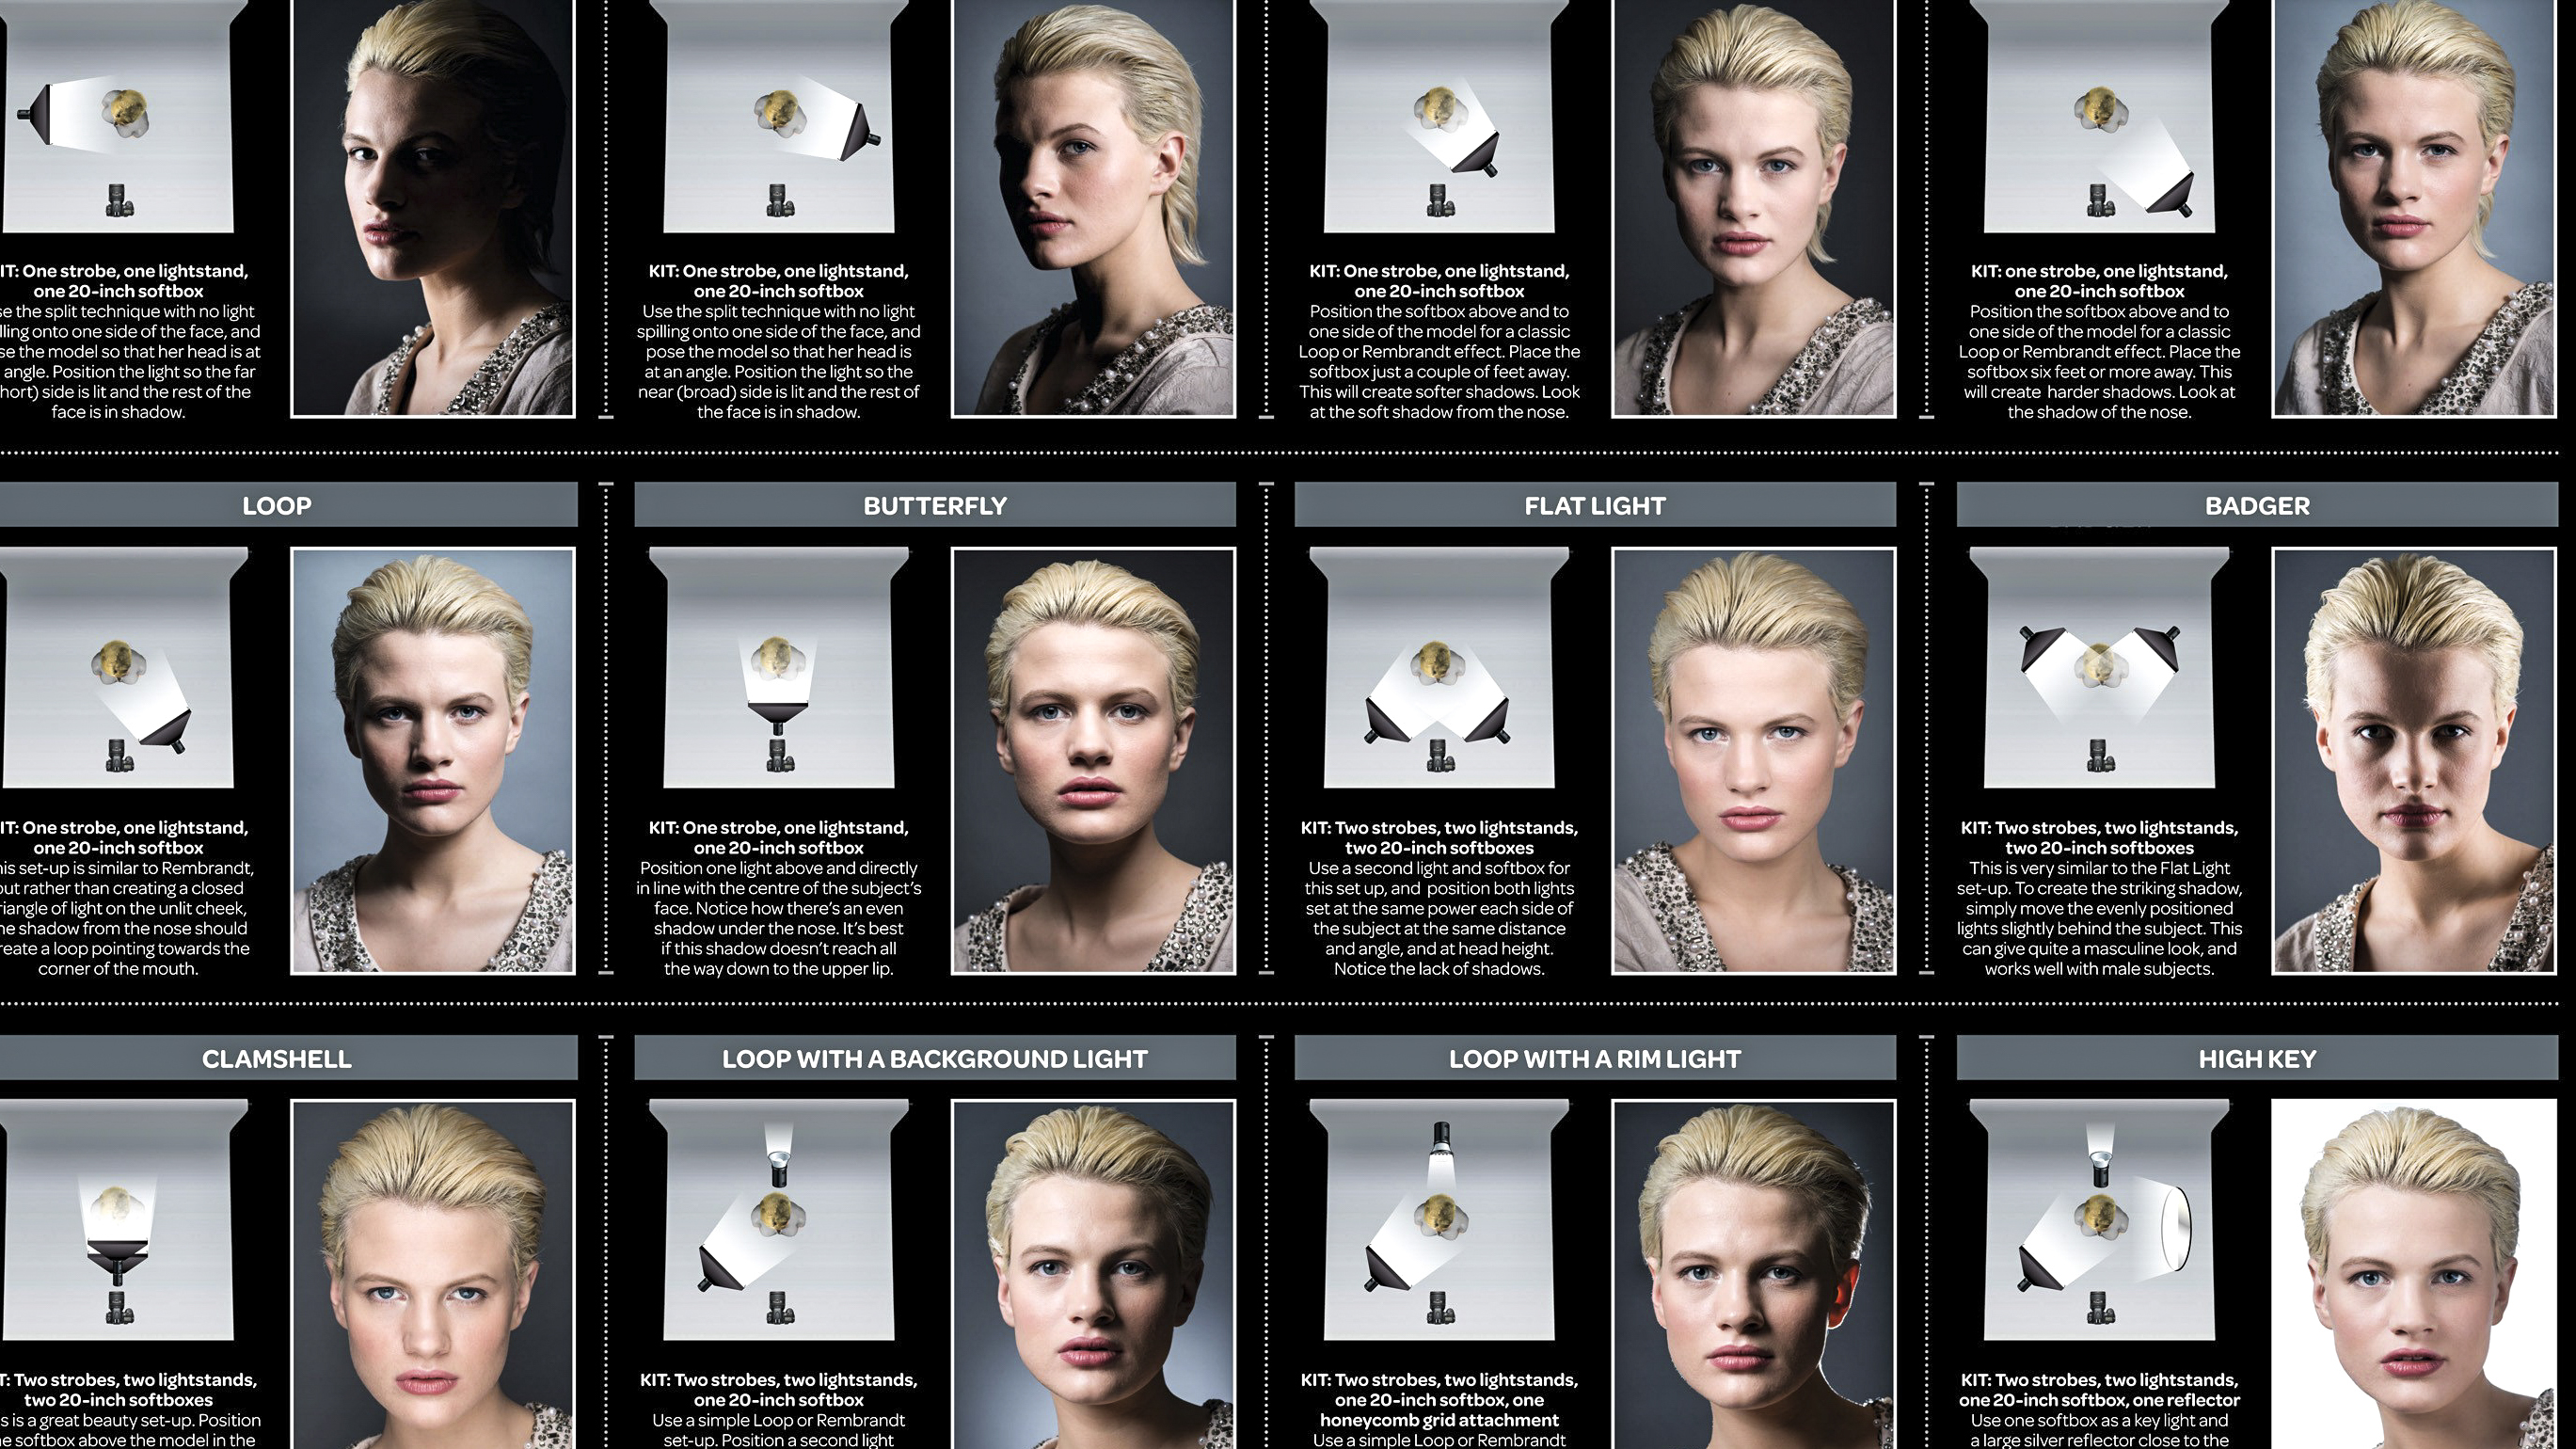
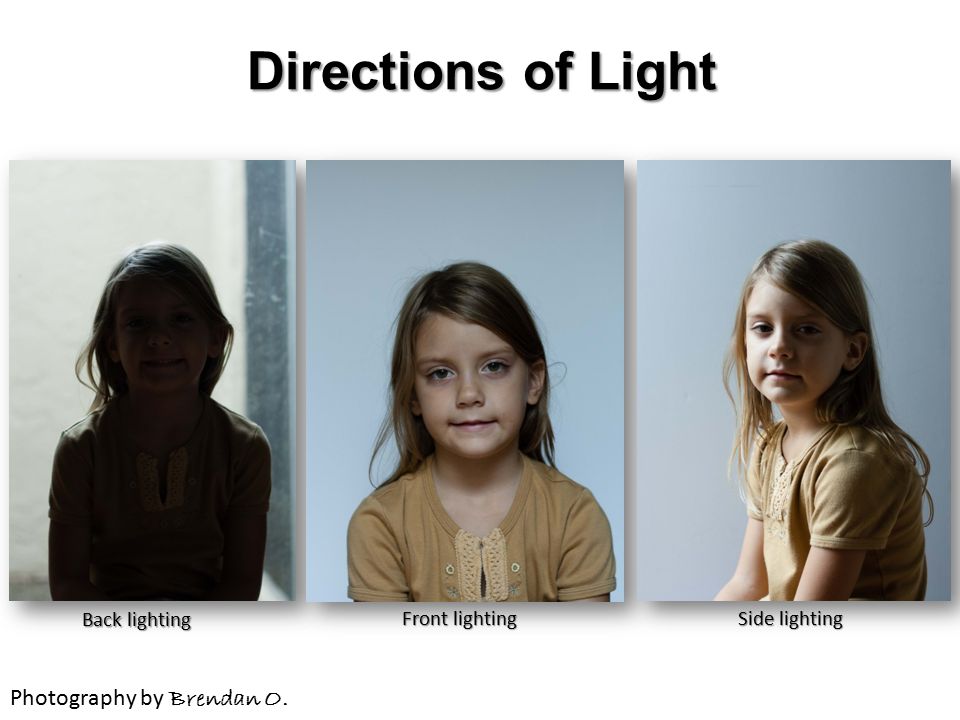
The position of a light source determines how it interacts with the subject’s features. Even a small change in angle can significantly alter the final image.
A frontal light placement reduces shadows and creates a flatter image. While this can be useful for certain applications, it often lacks depth. Side lighting introduces shadows that define structure, making the subject appear more three-dimensional.
Height also plays an important role. Lights positioned slightly above eye level create natural-looking shadows under the chin and cheekbones, mimicking how light behaves in real-world conditions. Lights placed too low can produce unnatural and unflattering results.
Consistency in positioning ensures that lighting remains predictable across different recording sessions.
Controlling Intensity and Contrast

Lighting intensity must be balanced to avoid overexposure or excessive contrast. The relationship between the key light and fill light determines the overall contrast ratio of the image.
A high contrast setup, where the key light is significantly stronger than the fill light, produces deeper shadows and a more dramatic appearance. A low contrast setup, where both lights are closer in intensity, creates a softer and more neutral look.
Adjusting intensity is not only about brightness. It is about controlling how much detail is retained in both highlights and shadows. Proper exposure ensures that the subject remains clear without losing depth.
Background Lighting and Depth Creation
A common mistake in studio setups is neglecting the background. Without proper lighting, the background appears flat, reducing the overall visual quality.
Introducing controlled background lighting adds separation and depth. This can be achieved through subtle illumination behind the subject or by using accent lights to create gradients or color variation.
The distance between the subject and the background also influences depth. Greater separation allows light to fall off naturally, enhancing the three-dimensional appearance of the scene.
Common Mistakes in Studio Lighting


Many lighting issues do not come from lack of equipment, but from incorrect placement and imbalance.
Overexposure occurs when light intensity is too high or improperly directed. This removes detail and creates an unnatural look. Harsh shadows often result from using undiffused light sources or placing lights at incorrect angles.
Another common issue is uneven lighting, where one side of the subject is significantly brighter than the other without intentional design. This creates visual imbalance and reduces professionalism.
Avoiding these mistakes requires careful observation and incremental adjustments rather than drastic changes.
Conclusion
Studio lighting is a system of controlled variables. Each component—position, intensity, quality, and direction—works together to define the final image.
A well-executed lighting setup does not draw attention to itself. Instead, it enhances the subject naturally, creating a clean and professional result that remains consistent across different sessions.
Mastery of studio lighting is not achieved through complex equipment, but through understanding how light behaves and how it can be shaped to serve the intended visual outcome.


